To calculate the hours worked from Google Calendar, you can utilise a time tracking tool like TimeNavi. TimeNavi automatically calculates your time from Google Calendar. You can see a breakdown of your time per employee, per project, and even billable vs non-billable hours. This article will walk you through how to do this in just a few clicks.
Here are five simple steps to calculate hours worked:
Sign in to TimeNavi and connect to Google Calendar.
Specify the date range.
Tell TimeNavi the codes or categories for your billable vs non-billable hours.
TimeNavi will then calculate the total hours worked by summing up the duration of each calendar event. This will then be shown as hours per employee.
Export this categorised time/data to Google Sheets or Excel
Rinse and Repeat!
In today's fast-paced world, efficiently tracking work hours is crucial for everything from employee time tracking to project budgeting. Many rely on tools like Google Calendar to manage their work hours, employee hours and billable hours. But did you know that, with the right tools, Google Calendar can also become an advanced time tracking software? With tools such as TimeNavi, you can effortlessly convert those calendar events into a comprehensive work hour tracker. This integration is not only useful for individual time-based billing but can also play a pivotal role in enterprise time tracking and payroll automation. This article will delve into how you can leverage Google Calendar for accurate time tracking and offer insights into calendar-based project management, all in just a few simple steps. Here are a few screenshots to show you the eventual outcome:
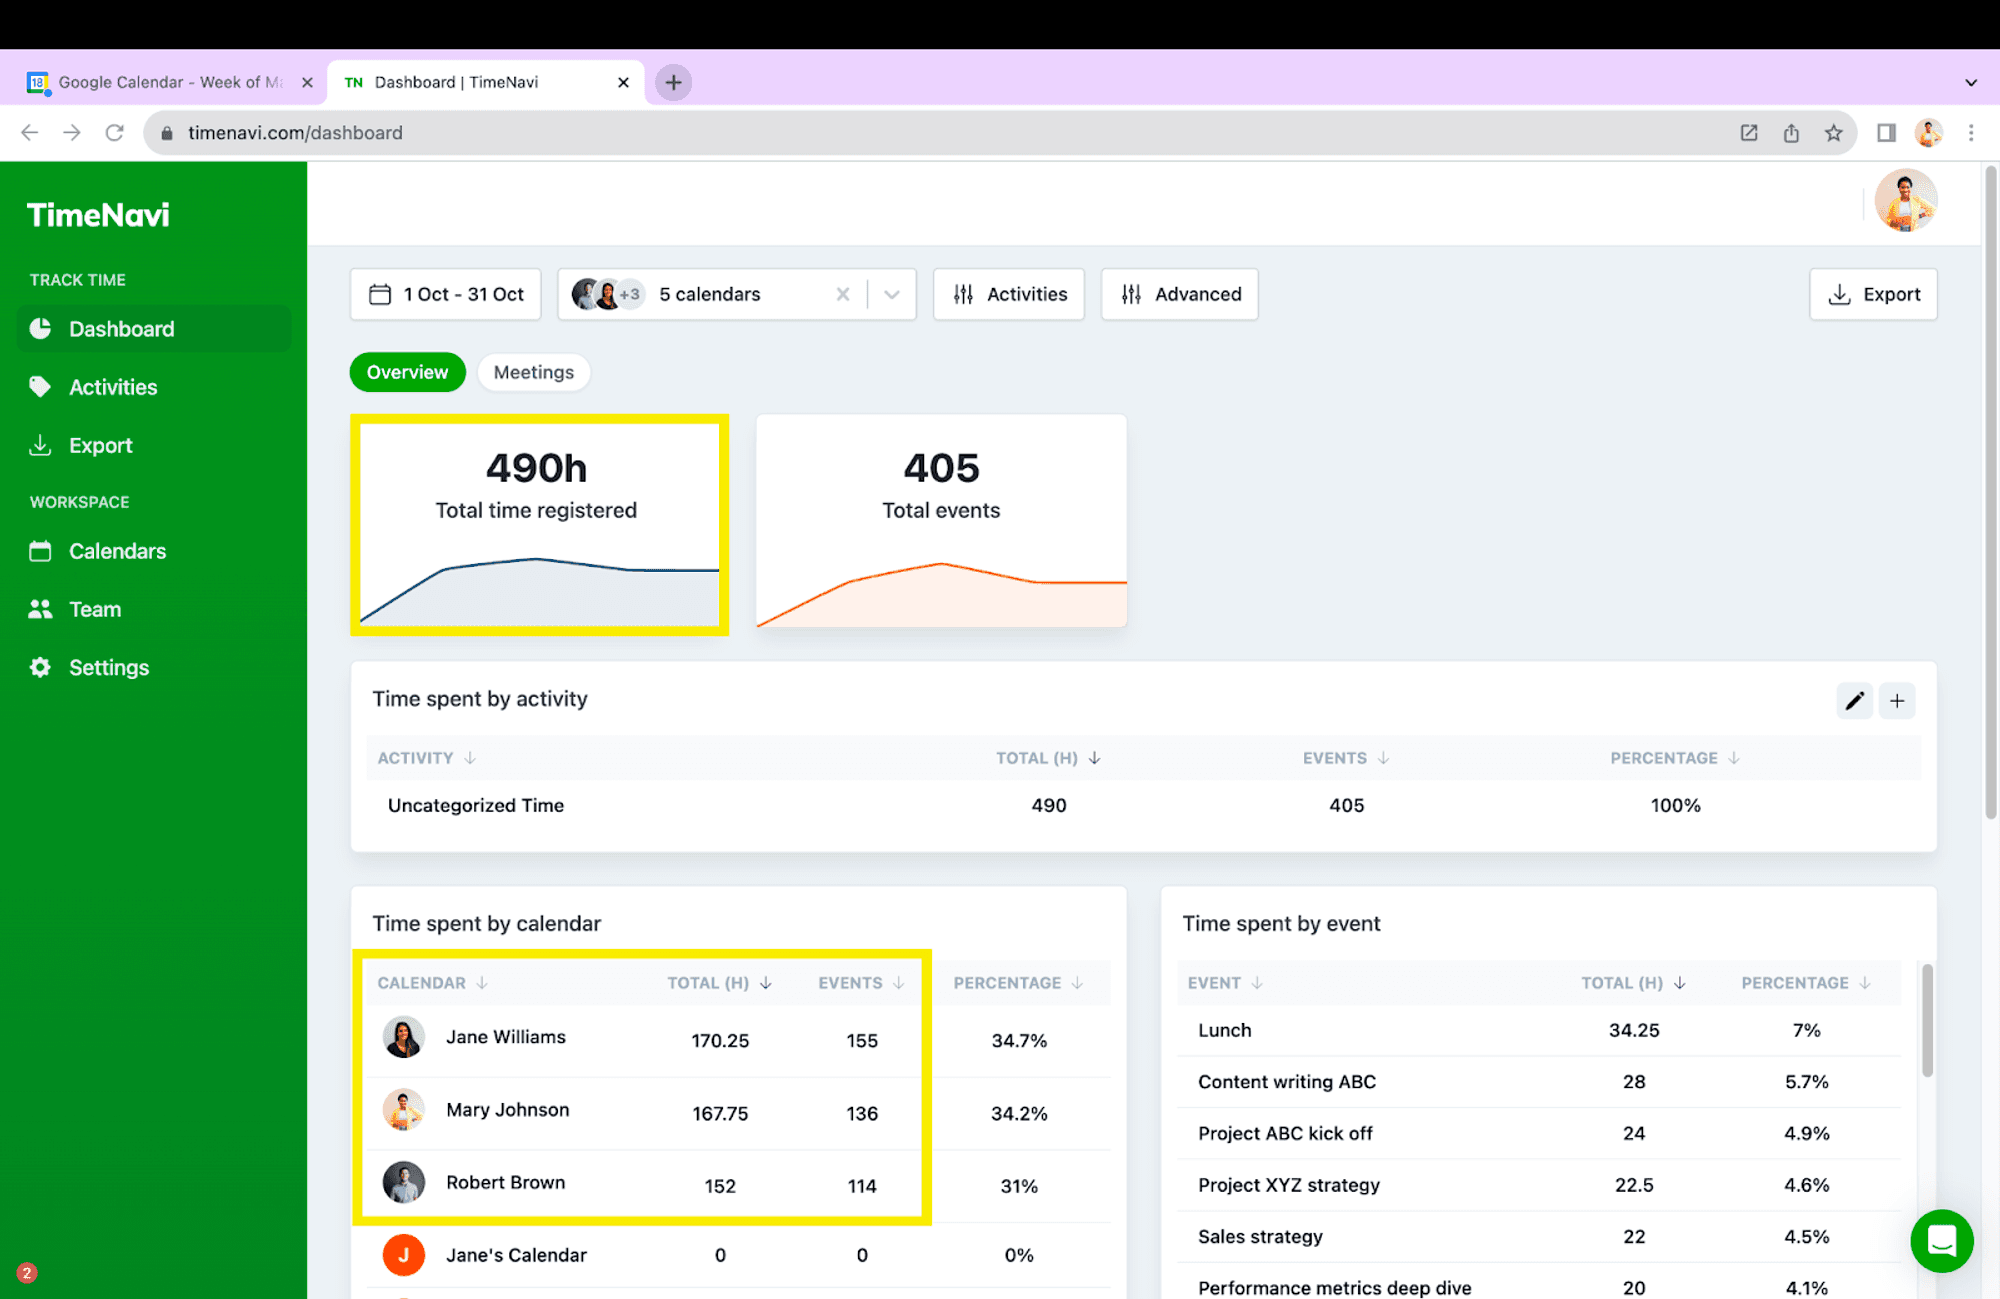
This is an example of the number of hours per employee in the TimeNavi app:

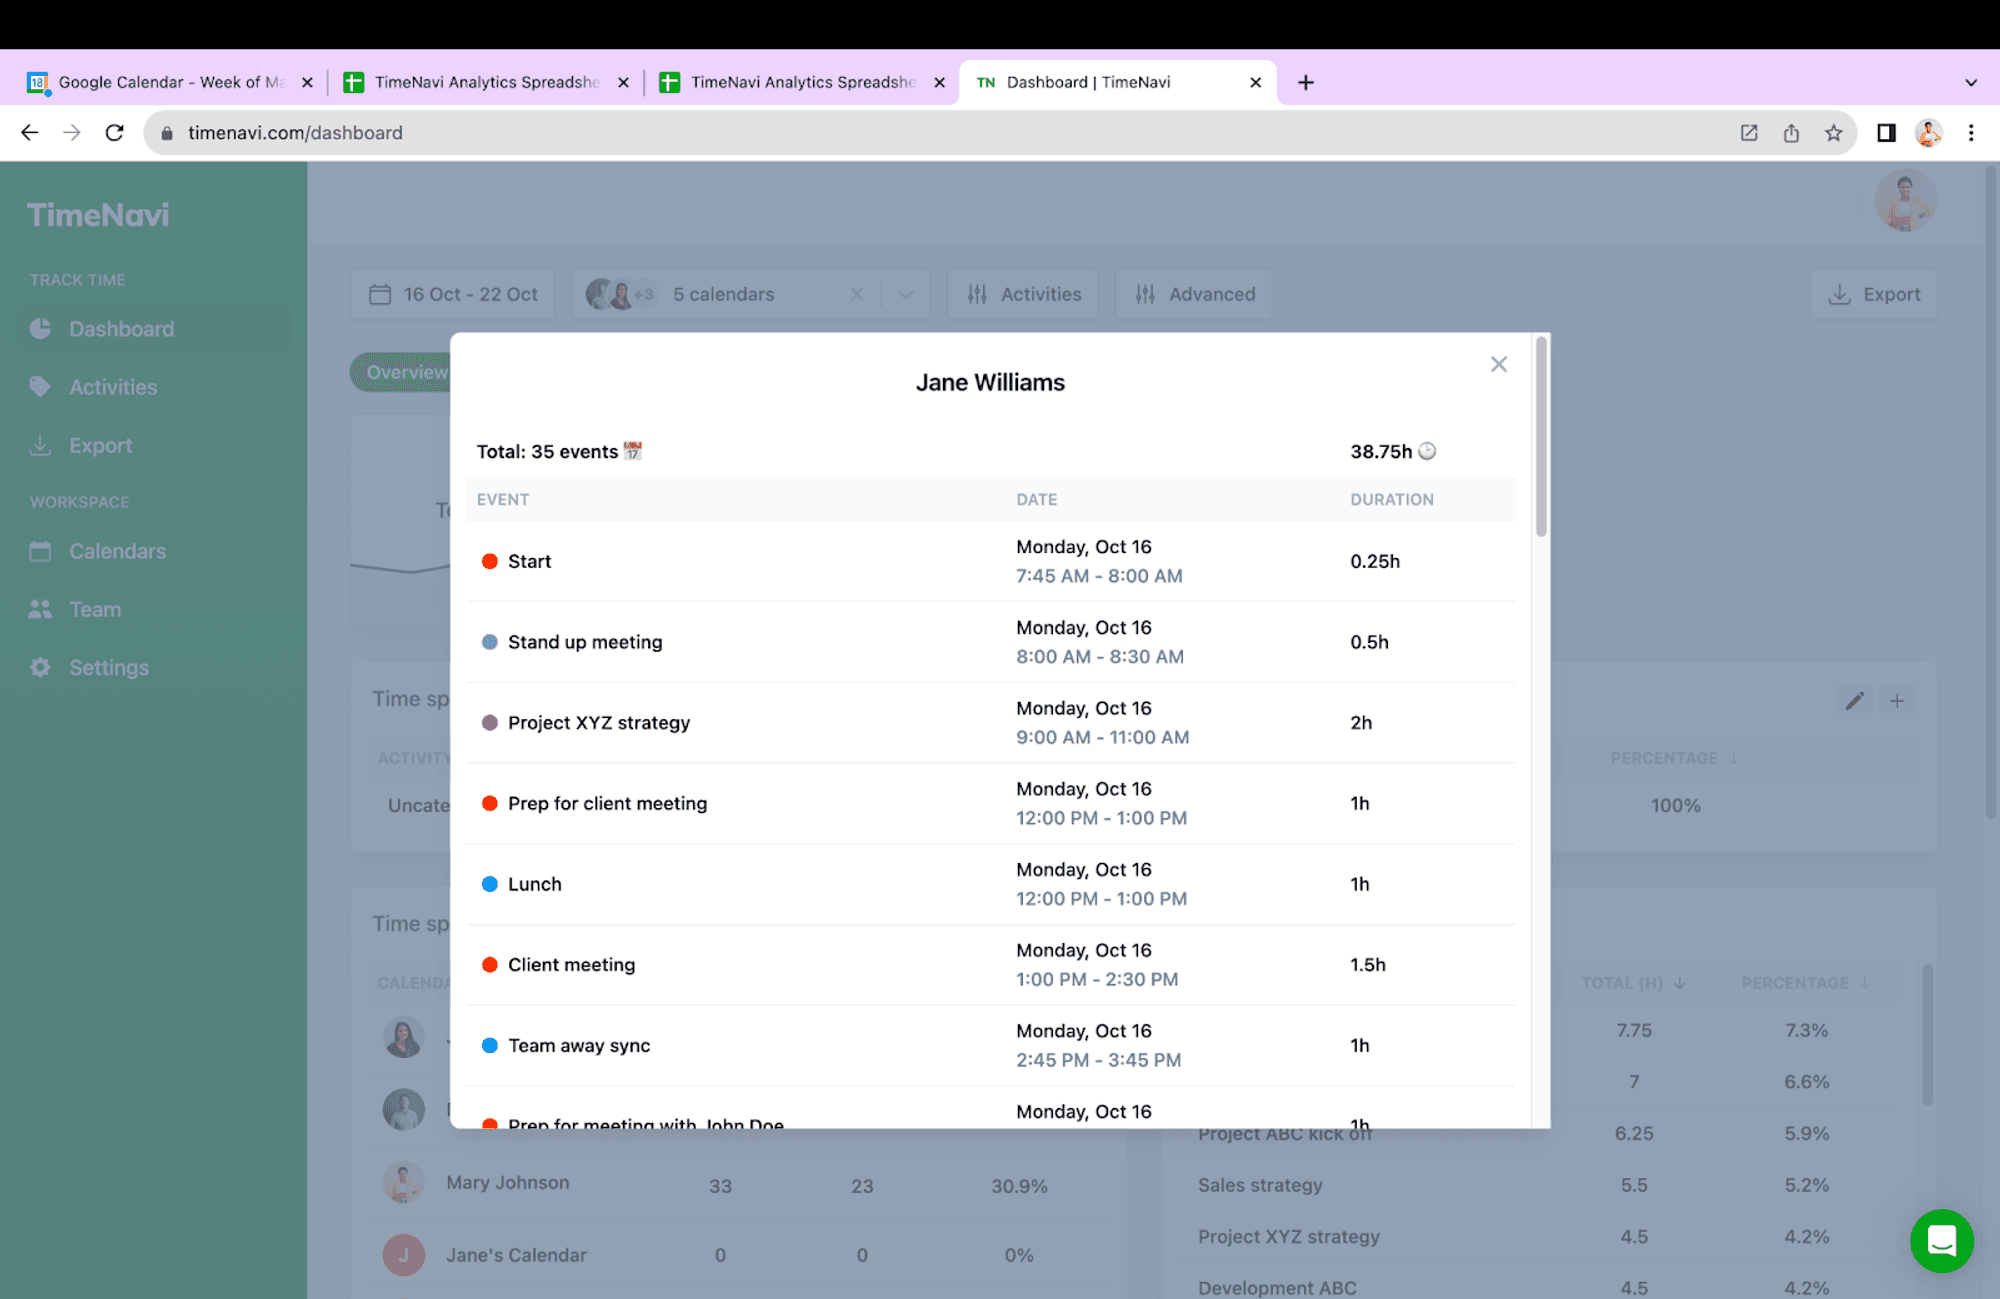
There are loads of interesting features here. Most importantly you can see the number of hours for Jane, Robert and Mary in the ‘time spent by calendar’ section. You can even zoom into what is being calculated here.

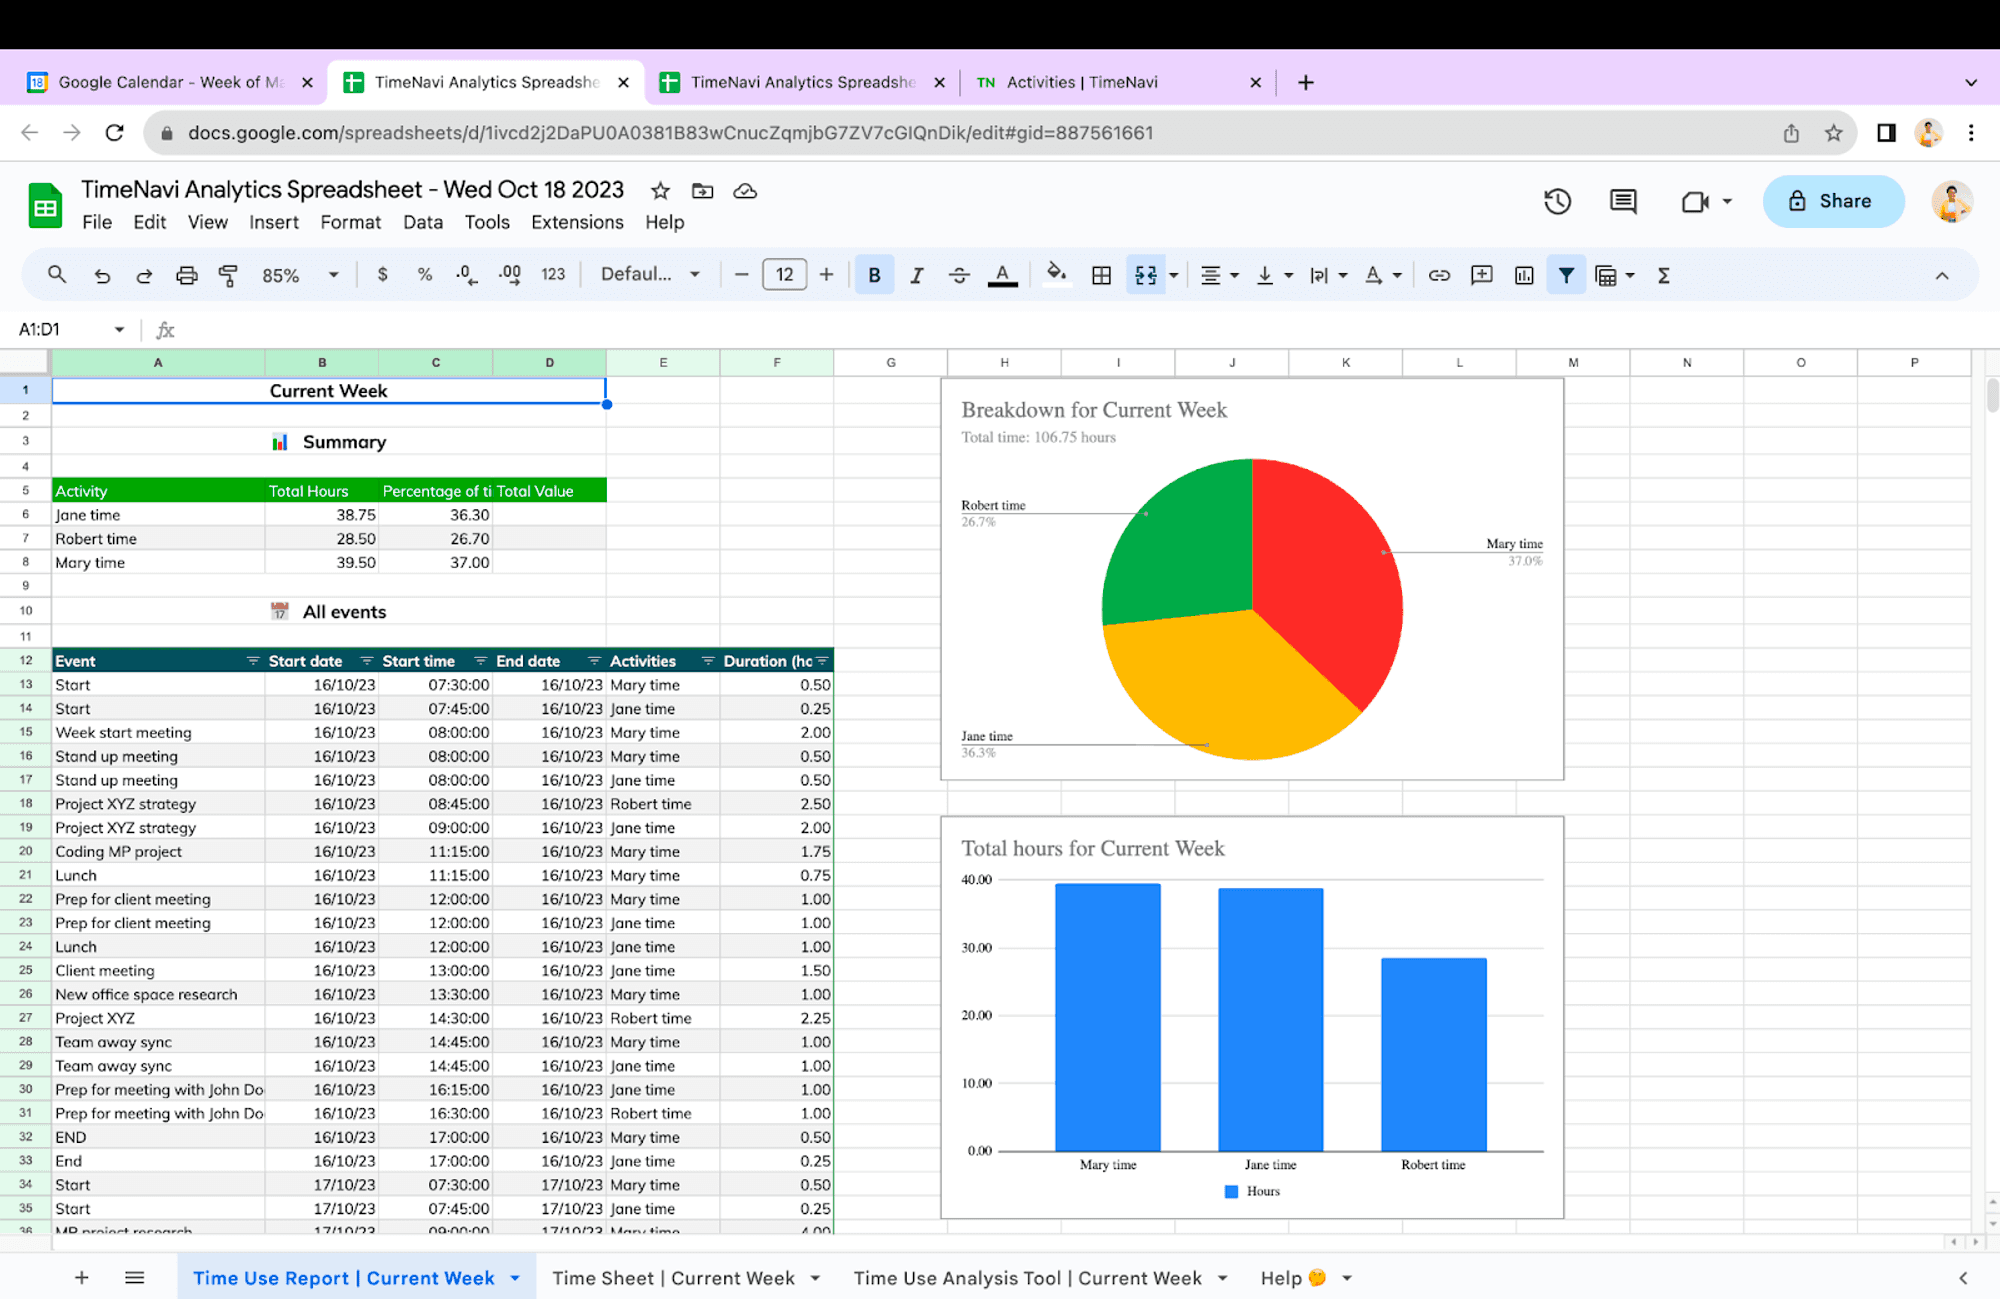
Here is that data in our customisable exports and reports:

Here's a step-by-step guide to help you get started:
Sign in to TimeNavi using your Google account credentials.

Connect the Google Calendar you want to track the hours from.

Specify the date range for which you want to calculate the hours worked. You can either pick a pre-defined range on the left or choose custom dates. When picking custom dates, the first click is the start date, and the second click is the end date.

TimeNavi will then calculate the total hours worked by summing up the duration of each calendar event. This will then be shown as hours per employee.

Bonus Features: Adding $$$ Billable vs Non-Billable Hours, Invoices and Reporting
TimeNavi also offers advanced features to categorise your employee's time. One example is categorising time into billable and non-billable hours. This is fully customisable though, so you can categorise it however you want.

You can do this fairly easily for each employee, project or billable hour you want to track:
In Google Calendar create a ‘rule’ for tracking billable hours. In this example, all the orange events are billable:

Start to create an activity (activity is a category of time or a time bucket) by clicking on the ‘+ button’ in the top right of the Time Spent by Activity box:

Tell TimeNavi how to categorise your time. Our rule is that all billable calendar events are orange. So we just name the activity Billable hours and then tell TimeNavi to find all orange (tangerine) events:

Then add an hourly rate to the activity.

Click Create Activity:

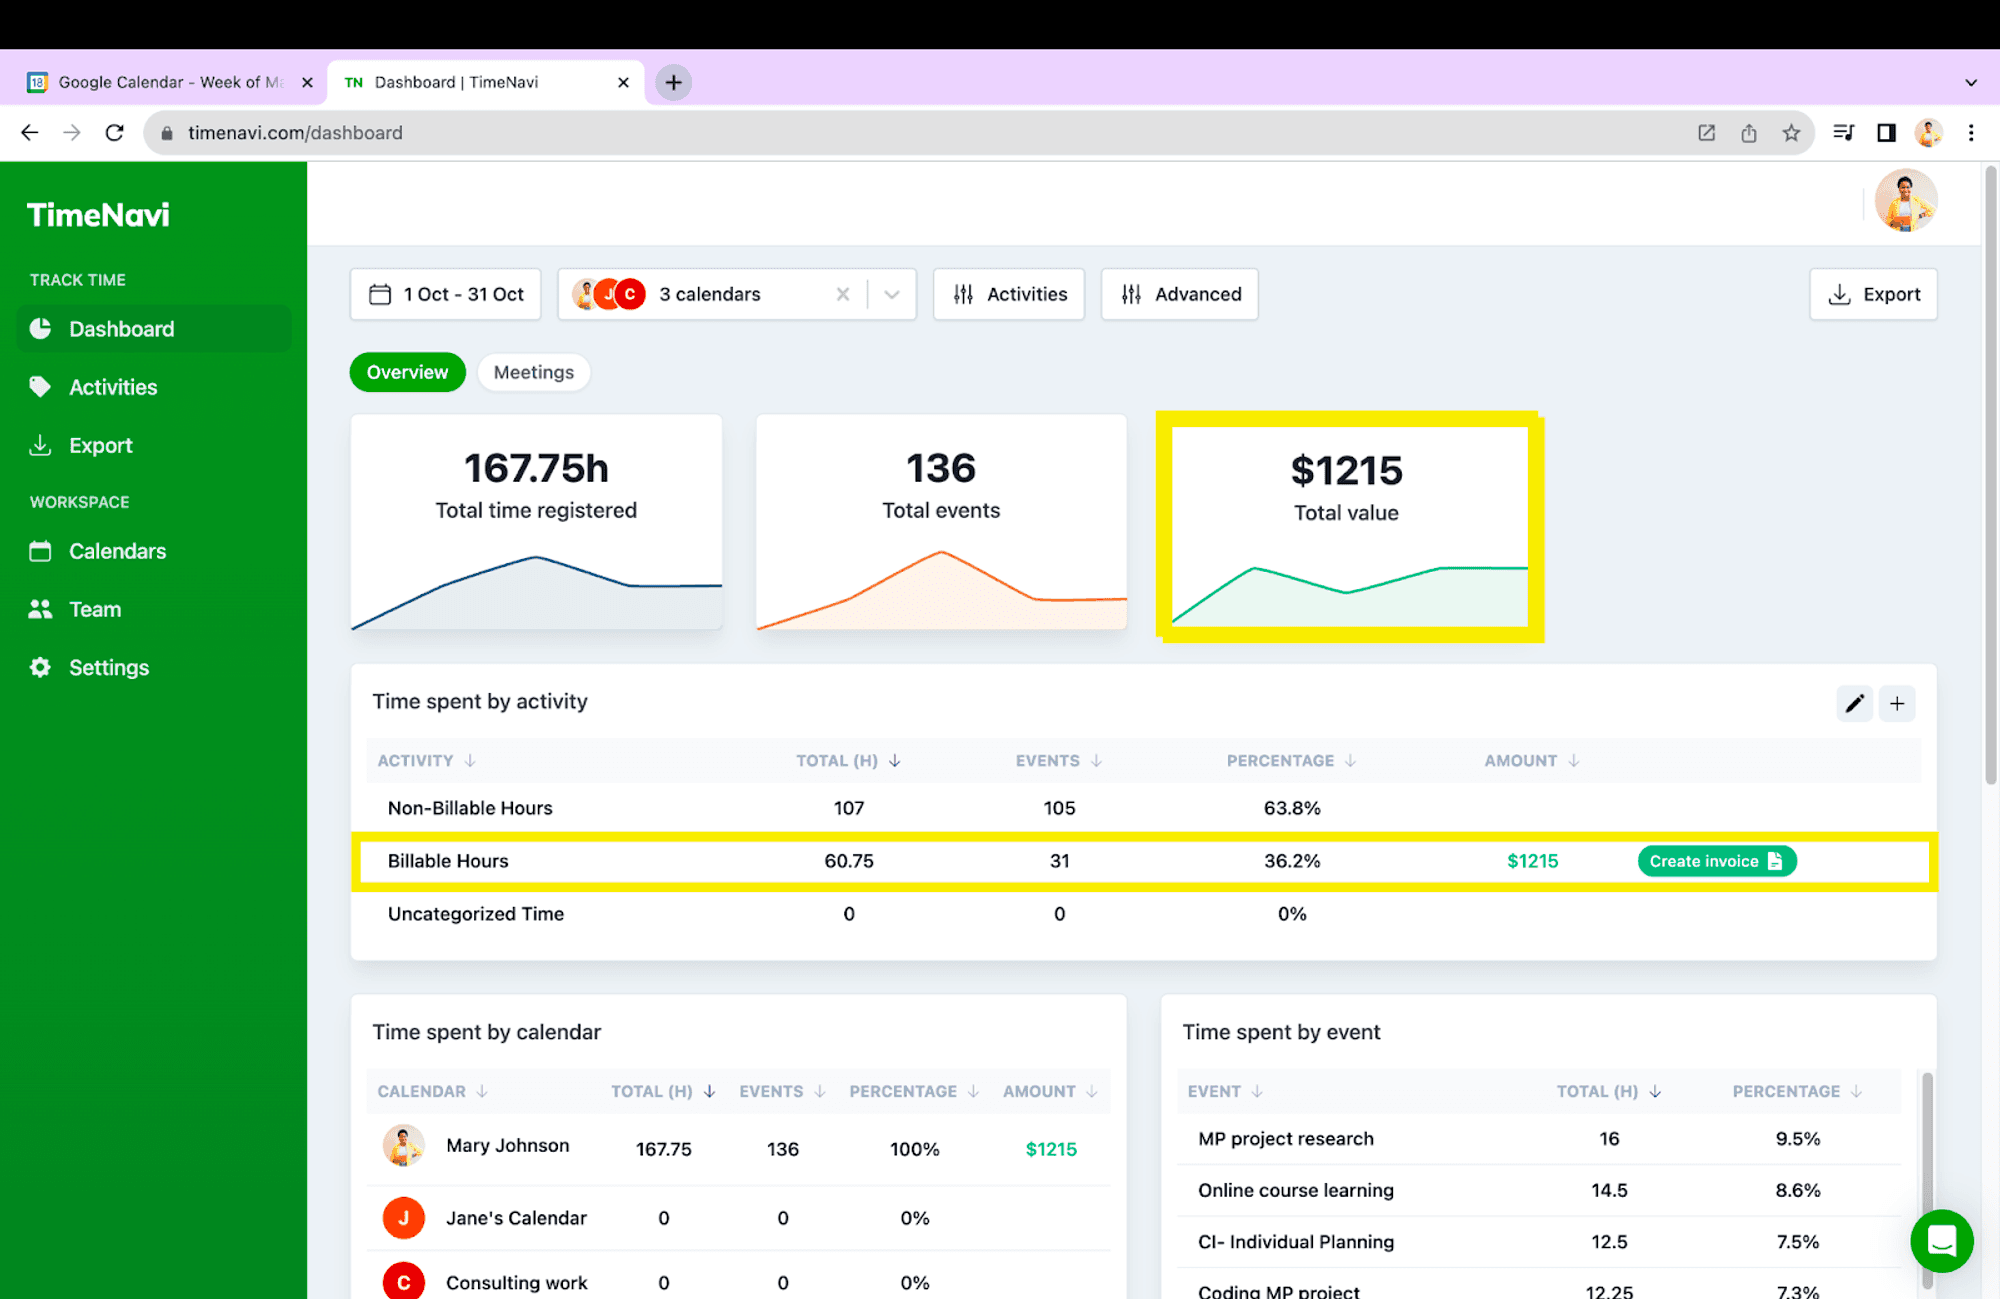
Voila! You have the amount of money you have earned included in the dashboard.

In the evolving landscape of project management and time tracking, tools like TimeNavi stand out for their versatility and ease of use. By categorising employee hours into 'Billable' and 'Non-Billable' or any other customisable category, businesses can gain a clearer perspective on their operations. With features that facilitate advanced Google Calendar time tracking and payroll automation software capabilities, TimeNavi proves to be an invaluable asset for organisations aiming to streamline their time-based billing and enhance their calendar-based project management strategies. Whether you're a small business looking for a work hour tracker or an enterprise seeking comprehensive project time tracking, TimeNavi provides the solutions you need for efficiency and accuracy in today's competitive market. Never manually count an hour again - give us a try and let us do that for you:
To calculate the hours worked from Google Calendar, you can utilise a time tracking tool like TimeNavi. TimeNavi automatically calculates your time from Google Calendar. You can see a breakdown of your time per employee, per project, and even billable vs non-billable hours. This article will walk you through how to do this in just a few clicks.
Here are five simple steps to calculate hours worked:
Sign in to TimeNavi and connect to Google Calendar.
Specify the date range.
Tell TimeNavi the codes or categories for your billable vs non-billable hours.
TimeNavi will then calculate the total hours worked by summing up the duration of each calendar event. This will then be shown as hours per employee.
Export this categorised time/data to Google Sheets or Excel
Rinse and Repeat!
In today's fast-paced world, efficiently tracking work hours is crucial for everything from employee time tracking to project budgeting. Many rely on tools like Google Calendar to manage their work hours, employee hours and billable hours. But did you know that, with the right tools, Google Calendar can also become an advanced time tracking software? With tools such as TimeNavi, you can effortlessly convert those calendar events into a comprehensive work hour tracker. This integration is not only useful for individual time-based billing but can also play a pivotal role in enterprise time tracking and payroll automation. This article will delve into how you can leverage Google Calendar for accurate time tracking and offer insights into calendar-based project management, all in just a few simple steps. Here are a few screenshots to show you the eventual outcome:
This is an example of the number of hours per employee in the TimeNavi app:

There are loads of interesting features here. Most importantly you can see the number of hours for Jane, Robert and Mary in the ‘time spent by calendar’ section. You can even zoom into what is being calculated here.

Here is that data in our customisable exports and reports:

Here's a step-by-step guide to help you get started:
Sign in to TimeNavi using your Google account credentials.

Connect the Google Calendar you want to track the hours from.

Specify the date range for which you want to calculate the hours worked. You can either pick a pre-defined range on the left or choose custom dates. When picking custom dates, the first click is the start date, and the second click is the end date.

TimeNavi will then calculate the total hours worked by summing up the duration of each calendar event. This will then be shown as hours per employee.

Bonus Features: Adding $$$ Billable vs Non-Billable Hours, Invoices and Reporting
TimeNavi also offers advanced features to categorise your employee's time. One example is categorising time into billable and non-billable hours. This is fully customisable though, so you can categorise it however you want.

You can do this fairly easily for each employee, project or billable hour you want to track:
In Google Calendar create a ‘rule’ for tracking billable hours. In this example, all the orange events are billable:

Start to create an activity (activity is a category of time or a time bucket) by clicking on the ‘+ button’ in the top right of the Time Spent by Activity box:

Tell TimeNavi how to categorise your time. Our rule is that all billable calendar events are orange. So we just name the activity Billable hours and then tell TimeNavi to find all orange (tangerine) events:

Then add an hourly rate to the activity.

Click Create Activity:

Voila! You have the amount of money you have earned included in the dashboard.

In the evolving landscape of project management and time tracking, tools like TimeNavi stand out for their versatility and ease of use. By categorising employee hours into 'Billable' and 'Non-Billable' or any other customisable category, businesses can gain a clearer perspective on their operations. With features that facilitate advanced Google Calendar time tracking and payroll automation software capabilities, TimeNavi proves to be an invaluable asset for organisations aiming to streamline their time-based billing and enhance their calendar-based project management strategies. Whether you're a small business looking for a work hour tracker or an enterprise seeking comprehensive project time tracking, TimeNavi provides the solutions you need for efficiency and accuracy in today's competitive market. Never manually count an hour again - give us a try and let us do that for you:
To calculate the hours worked from Google Calendar, you can utilise a time tracking tool like TimeNavi. TimeNavi automatically calculates your time from Google Calendar. You can see a breakdown of your time per employee, per project, and even billable vs non-billable hours. This article will walk you through how to do this in just a few clicks.
Here are five simple steps to calculate hours worked:
Sign in to TimeNavi and connect to Google Calendar.
Specify the date range.
Tell TimeNavi the codes or categories for your billable vs non-billable hours.
TimeNavi will then calculate the total hours worked by summing up the duration of each calendar event. This will then be shown as hours per employee.
Export this categorised time/data to Google Sheets or Excel
Rinse and Repeat!
In today's fast-paced world, efficiently tracking work hours is crucial for everything from employee time tracking to project budgeting. Many rely on tools like Google Calendar to manage their work hours, employee hours and billable hours. But did you know that, with the right tools, Google Calendar can also become an advanced time tracking software? With tools such as TimeNavi, you can effortlessly convert those calendar events into a comprehensive work hour tracker. This integration is not only useful for individual time-based billing but can also play a pivotal role in enterprise time tracking and payroll automation. This article will delve into how you can leverage Google Calendar for accurate time tracking and offer insights into calendar-based project management, all in just a few simple steps. Here are a few screenshots to show you the eventual outcome:
This is an example of the number of hours per employee in the TimeNavi app:

There are loads of interesting features here. Most importantly you can see the number of hours for Jane, Robert and Mary in the ‘time spent by calendar’ section. You can even zoom into what is being calculated here.

Here is that data in our customisable exports and reports:

Here's a step-by-step guide to help you get started:
Sign in to TimeNavi using your Google account credentials.

Connect the Google Calendar you want to track the hours from.

Specify the date range for which you want to calculate the hours worked. You can either pick a pre-defined range on the left or choose custom dates. When picking custom dates, the first click is the start date, and the second click is the end date.

TimeNavi will then calculate the total hours worked by summing up the duration of each calendar event. This will then be shown as hours per employee.

Bonus Features: Adding $$$ Billable vs Non-Billable Hours, Invoices and Reporting
TimeNavi also offers advanced features to categorise your employee's time. One example is categorising time into billable and non-billable hours. This is fully customisable though, so you can categorise it however you want.

You can do this fairly easily for each employee, project or billable hour you want to track:
In Google Calendar create a ‘rule’ for tracking billable hours. In this example, all the orange events are billable:

Start to create an activity (activity is a category of time or a time bucket) by clicking on the ‘+ button’ in the top right of the Time Spent by Activity box:

Tell TimeNavi how to categorise your time. Our rule is that all billable calendar events are orange. So we just name the activity Billable hours and then tell TimeNavi to find all orange (tangerine) events:

Then add an hourly rate to the activity.

Click Create Activity:

Voila! You have the amount of money you have earned included in the dashboard.

In the evolving landscape of project management and time tracking, tools like TimeNavi stand out for their versatility and ease of use. By categorising employee hours into 'Billable' and 'Non-Billable' or any other customisable category, businesses can gain a clearer perspective on their operations. With features that facilitate advanced Google Calendar time tracking and payroll automation software capabilities, TimeNavi proves to be an invaluable asset for organisations aiming to streamline their time-based billing and enhance their calendar-based project management strategies. Whether you're a small business looking for a work hour tracker or an enterprise seeking comprehensive project time tracking, TimeNavi provides the solutions you need for efficiency and accuracy in today's competitive market. Never manually count an hour again - give us a try and let us do that for you:
To calculate the hours worked from Google Calendar, you can utilise a time tracking tool like TimeNavi. TimeNavi automatically calculates your time from Google Calendar. You can see a breakdown of your time per employee, per project, and even billable vs non-billable hours. This article will walk you through how to do this in just a few clicks.
Here are five simple steps to calculate hours worked:
Sign in to TimeNavi and connect to Google Calendar.
Specify the date range.
Tell TimeNavi the codes or categories for your billable vs non-billable hours.
TimeNavi will then calculate the total hours worked by summing up the duration of each calendar event. This will then be shown as hours per employee.
Export this categorised time/data to Google Sheets or Excel
Rinse and Repeat!
In today's fast-paced world, efficiently tracking work hours is crucial for everything from employee time tracking to project budgeting. Many rely on tools like Google Calendar to manage their work hours, employee hours and billable hours. But did you know that, with the right tools, Google Calendar can also become an advanced time tracking software? With tools such as TimeNavi, you can effortlessly convert those calendar events into a comprehensive work hour tracker. This integration is not only useful for individual time-based billing but can also play a pivotal role in enterprise time tracking and payroll automation. This article will delve into how you can leverage Google Calendar for accurate time tracking and offer insights into calendar-based project management, all in just a few simple steps. Here are a few screenshots to show you the eventual outcome:
This is an example of the number of hours per employee in the TimeNavi app:

There are loads of interesting features here. Most importantly you can see the number of hours for Jane, Robert and Mary in the ‘time spent by calendar’ section. You can even zoom into what is being calculated here.

Here is that data in our customisable exports and reports:

Here's a step-by-step guide to help you get started:
Sign in to TimeNavi using your Google account credentials.

Connect the Google Calendar you want to track the hours from.

Specify the date range for which you want to calculate the hours worked. You can either pick a pre-defined range on the left or choose custom dates. When picking custom dates, the first click is the start date, and the second click is the end date.

TimeNavi will then calculate the total hours worked by summing up the duration of each calendar event. This will then be shown as hours per employee.

Bonus Features: Adding $$$ Billable vs Non-Billable Hours, Invoices and Reporting
TimeNavi also offers advanced features to categorise your employee's time. One example is categorising time into billable and non-billable hours. This is fully customisable though, so you can categorise it however you want.

You can do this fairly easily for each employee, project or billable hour you want to track:
In Google Calendar create a ‘rule’ for tracking billable hours. In this example, all the orange events are billable:

Start to create an activity (activity is a category of time or a time bucket) by clicking on the ‘+ button’ in the top right of the Time Spent by Activity box:

Tell TimeNavi how to categorise your time. Our rule is that all billable calendar events are orange. So we just name the activity Billable hours and then tell TimeNavi to find all orange (tangerine) events:

Then add an hourly rate to the activity.

Click Create Activity:

Voila! You have the amount of money you have earned included in the dashboard.

In the evolving landscape of project management and time tracking, tools like TimeNavi stand out for their versatility and ease of use. By categorising employee hours into 'Billable' and 'Non-Billable' or any other customisable category, businesses can gain a clearer perspective on their operations. With features that facilitate advanced Google Calendar time tracking and payroll automation software capabilities, TimeNavi proves to be an invaluable asset for organisations aiming to streamline their time-based billing and enhance their calendar-based project management strategies. Whether you're a small business looking for a work hour tracker or an enterprise seeking comprehensive project time tracking, TimeNavi provides the solutions you need for efficiency and accuracy in today's competitive market. Never manually count an hour again - give us a try and let us do that for you:


