Tracking project time in Google Calendar seems like it should be a simple process but can be surprisingly hard. There are two easy ways to simplify the process of tracking time for your projects. One is standardising the event titles or colours for different projects in Google Calendar, the other is creating different calendars for different projects to keep them separate. There are pros and cons to each method which I’ll outline below.
Automatically Calculate your Project Time
Below I’ll outline the process of using Google Calendar as a project management tool. I’ll be referring to TimeNavi a lot as is a great way to calculate the time that you categorise in your Google Calendar. It takes codes from your event titles or colours from your calendar and calculates the number of hours you have spent on that code. It means that instead of trying to count every minute in Google Calendar you can add events in your calendar and TimeNavi will add up your hours for you. This was just a heads up for you so you know what I’m talking about later!
Time Tracking with Different Calendars
The first way you could use Google Calendar for project management is by creating separate calendars for different projects. You can share the project calendar with team members so everyone is on the same page (literally!).
Step 1: Create a separate calendar for each project you want to track.
Step 2: Give access to each of your team members to that project calendar.
Step 3: Instruct your team to add their time spent on that project to that 1 calendar.
Step 4: Use TimeNavi to calculate the time spent in that calendar.
Step 5: Either bill the client accordingly or analyse whether you have gone ‘over budget’.
Once you’ve done this, you can easily review the time spent on each project
Pros
Visual representation: You can easily separate out projects and see your team time spent visually quickly.
Shareability: You can share this project with your client and anyone else in your team to provide more transparency.
Cons
If you don’t regularly delete calendars you can end up with a messy workplace with hundreds of calendars.
If you have more than 5 people working on the project the calendar can become extremely cluttered. Here is an example of 10 or so events at the same time. It is unreadable.

Time Tracking with Different Colours
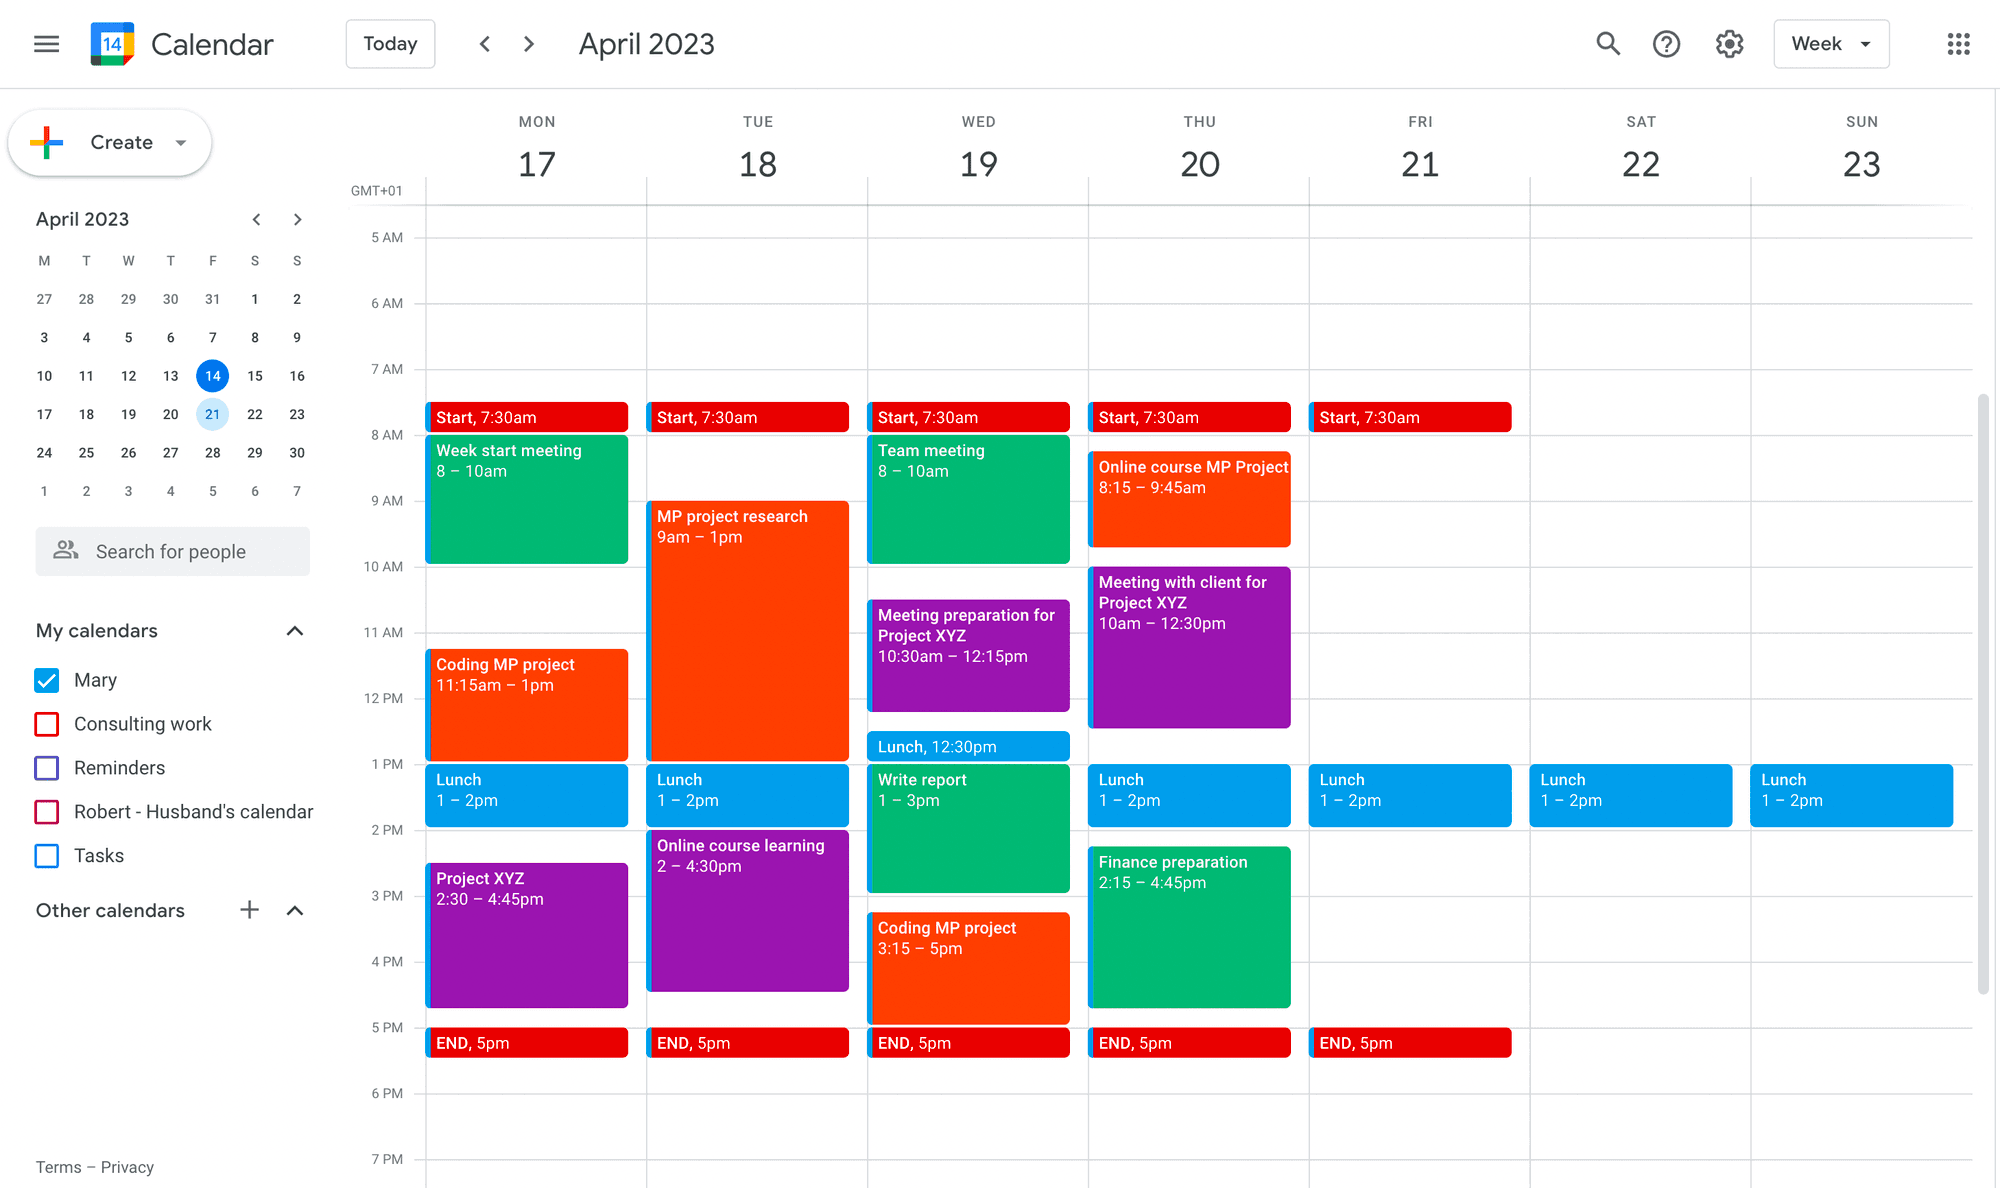
The second way to use Google Calendar is by colour-coding events. Assigning a different colour to each project can quickly help you identify which project you’re working on. When adding an event to your calendar, simply choose the colour that corresponds to the project. This will make it easier to visually distinguish which project a particular calendar event is for.
Step 1: Standardise the colour that each project needs to be. (For example “Project 1 is blue” and “Project 2 is yellow”.)
Step 2: Make sure all your team knows the Project colours.
Step 3: Instruct your team to make sure each event is the right colour for each project.
In this calendar the different colours represent different projects:
Orange: MP project
Purple: Project XYZ
Green: Generic work
Blue: Lunch
Step 4: Plug the color codes and related projects into TimeNavi (TimeNavi then calculates the time spent on each project for you.)
Step 5: Either bill the client accordingly or analyse whether you have gone ‘over budget’ for your client.
Pros
Visual representation: Color-coded time tracking can provide a quick and easy visual representation of how much time has been spent on each task or project, allowing project managers to quickly identify potential issues or areas of concern. - Easy to implement: Every event in Google Calendar already has a colour so it is easy to change the colour. (Top tip: right click on the event to quickly change the colour of the event.)
Cons
Shareability: You can’t share one calendar with your client with the time spent on the project. Instead, you need to export all of that time to Google Sheets or Excel (possible with TimeNavi) to give work visibility.
Colour limitation: Google Calendar only has a certain number of colours. Therefore if you have more than 10 projects you might run out of colours to use!
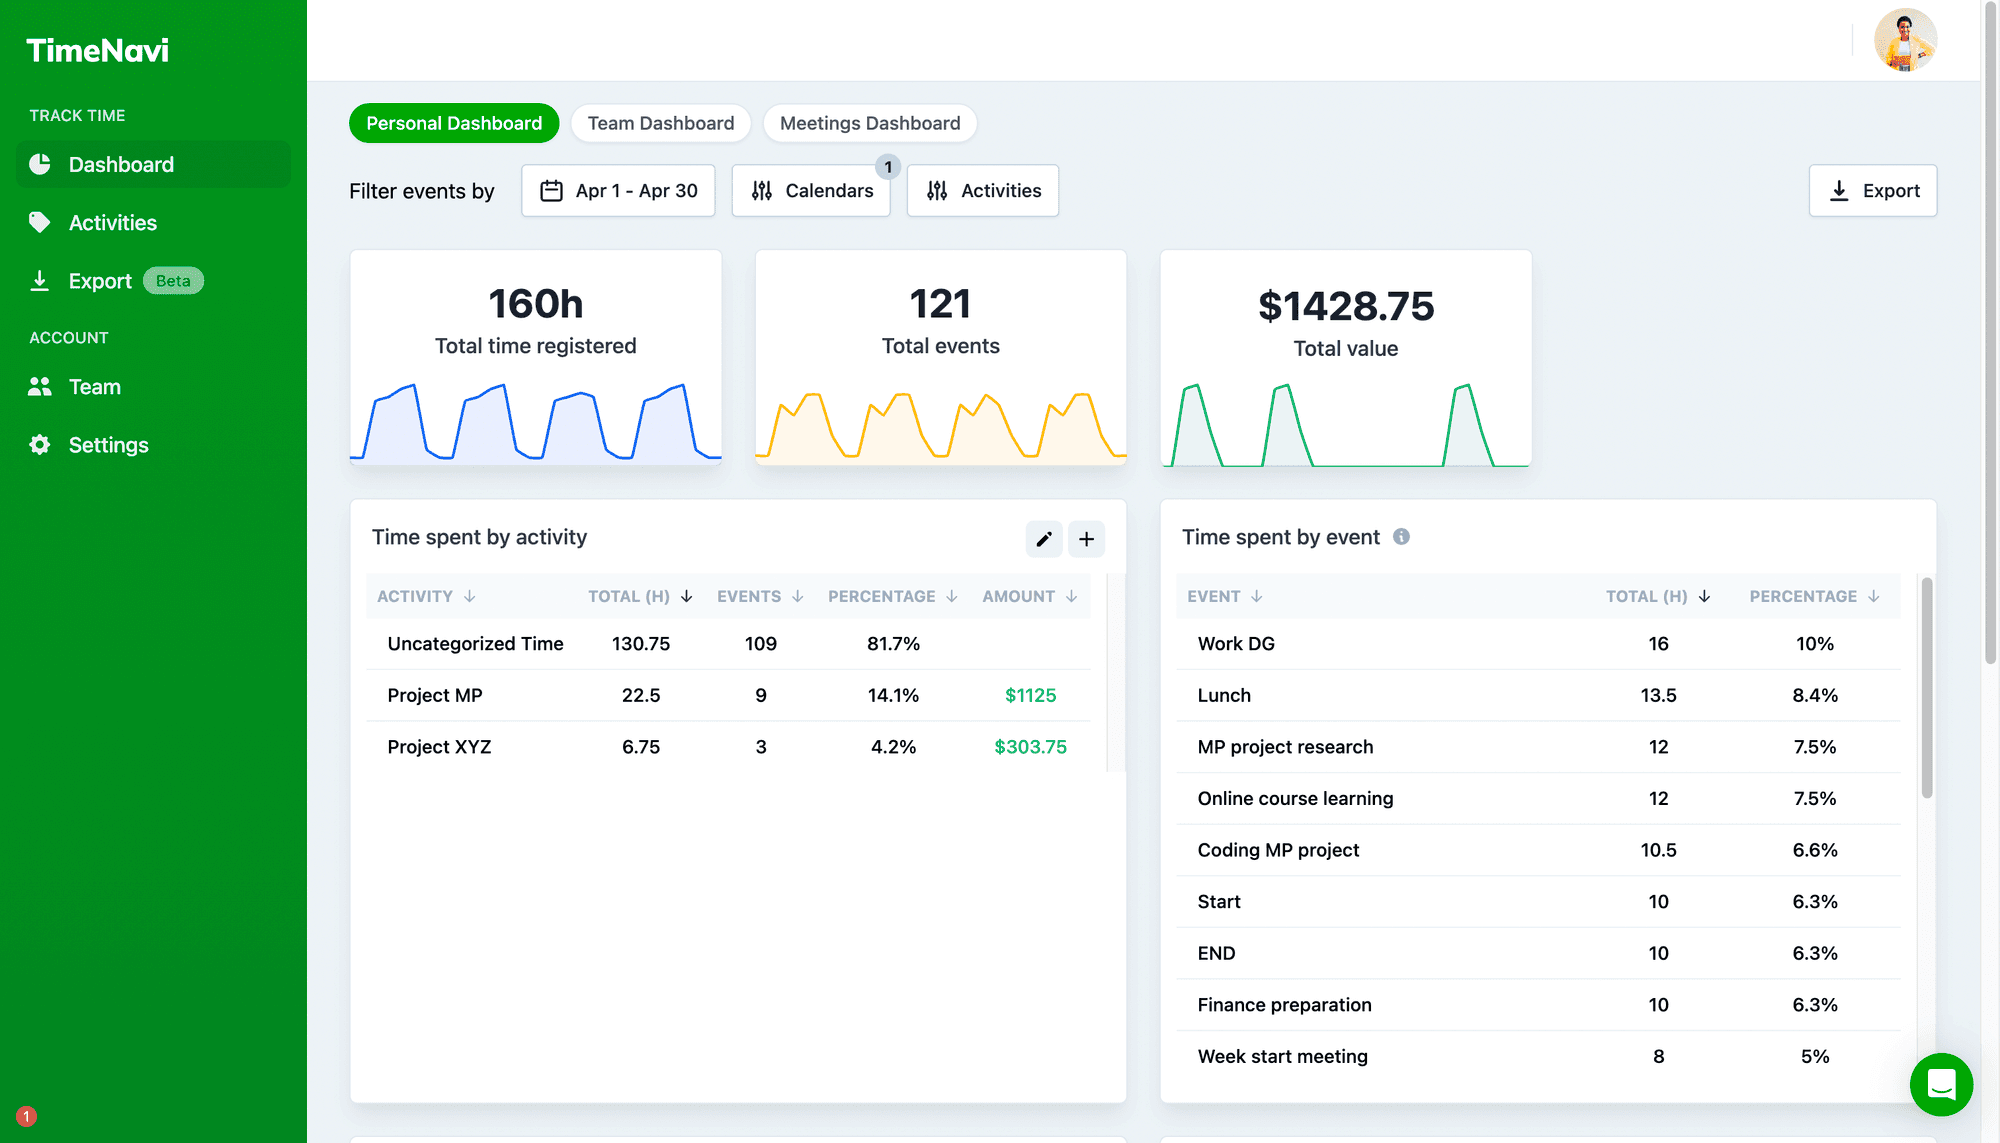
Here’s what that time breakdown would look like in TimeNavi! You can see in the “Time spent by activity” box that there is Project MP and Project XYZ. This show how many hours have been spent on each project over the course of the month of April.
Time Tracking with Different Titles
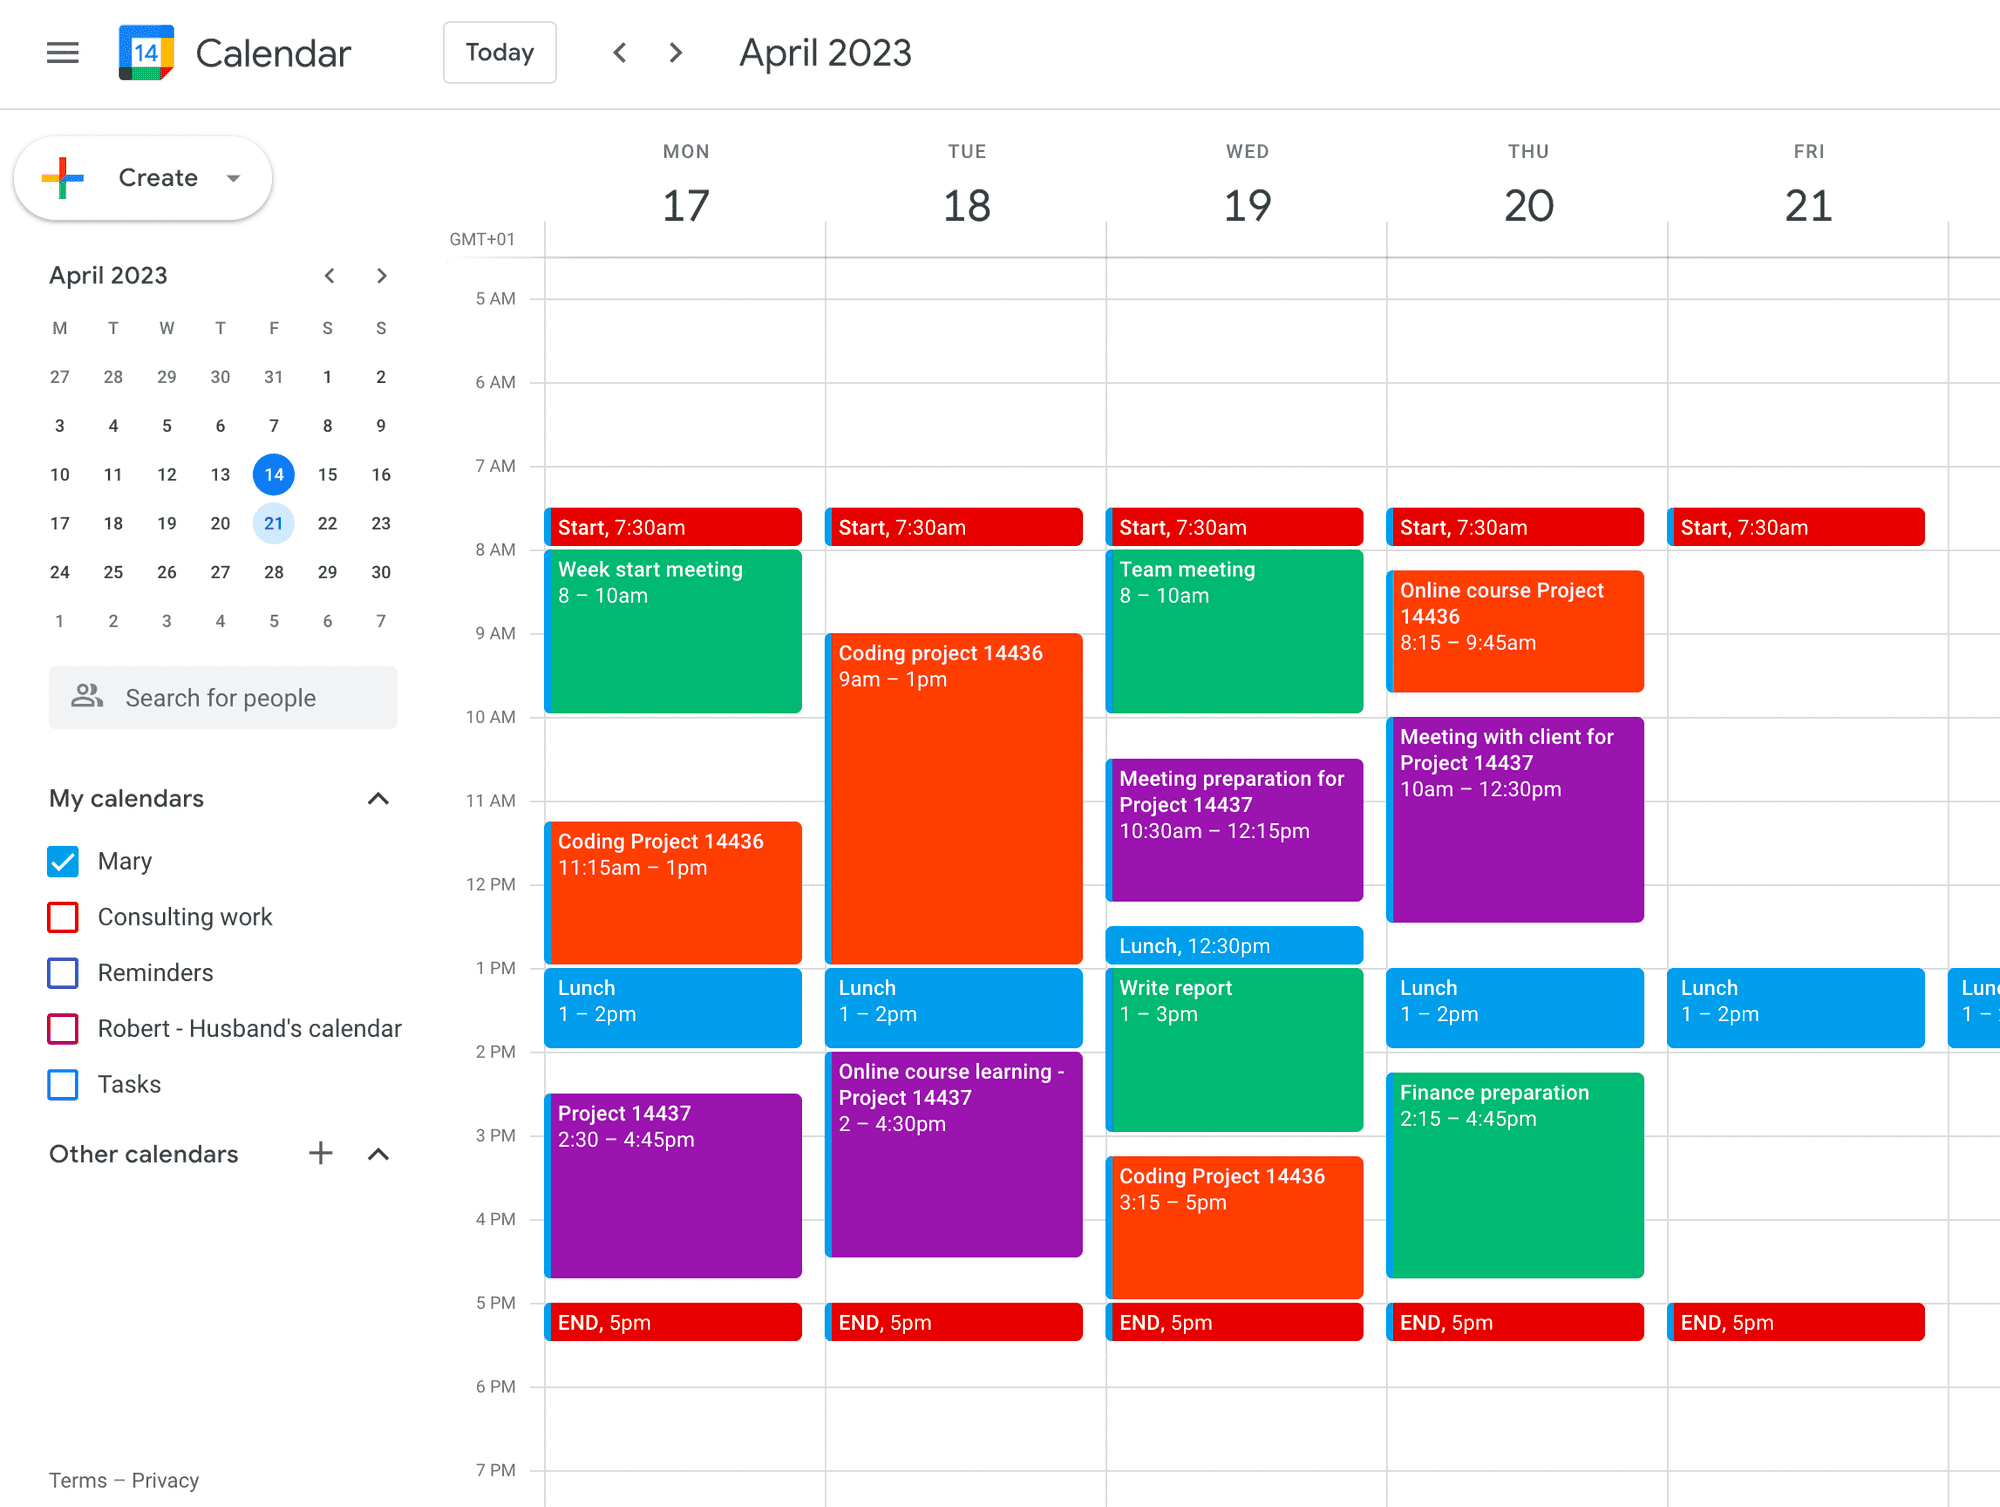
The third way to use Google Calendar for project management is by creating events with different titles. You can create events with titles such as “Project XYZ,” “Project ABC,” to help you keep track of time spent on different projects. This is especially useful if you have a project with multiple stages or if you want to keep track of the amount of time you’re spending on each stage.
Step 1: Standardise the code that needs to go in each event title for the project. (For example “Project 14436” and “Project 14437”.)
Step 2: Make sure all your team knows the Project titles.
Step 3: Instruct your team to add the project titles to all of their time spent on that project.
Step 4: Tell TimeNavi the colour codes and related projects. (TimeNavi then calculate the time spent on each project for you.)
Step 5: Either bill the client accordingly or analyse whether you have gone ‘over budget’.
I’ve given an example of what this might look like below!
Pros
Unlimited projects: As there are literally unlimited titles for events, you can create an unlimited number of projects.
Customisability to add different sub-categories to track. Say you want to track marketing on Project 14436. All you need to do is add marketing to the title and then you can track all events which have 14436 and marketing in the title. This means you can create as detailed breakdowns of project time spent.
Cons
Visual representation: It is not as easy to quickly see how much time each person in your team is spending on each project. You have to calculate it to find out. (TimeNavi also has a way of breaking down time spent on activity by person.)
Human error: It is way more easy to get a code wrong in the title of the event. If the code isn’t exactly right it won’t be included in the hours counted. (This is why we have implemented a tagging system for TimeNavi as well.)
Shareability: You can’t share one calendar with your client with the time spent on the project. Instead you need to export all of that time to Google Sheets or Excel (possible with TimeNavi) to give work visibility.
Conclusion
Google Calendar is a versatile tool for project management. By creating separate calendars, colour-coding events, or using coded event titles, you can effectively manage your projects without getting overwhelmed. In addition, by using a time tracking software like TimeNavi, you can keep track of the time spent on each project and ensure that you stay within budget.
I’ve outlined the different ways you can do this and although I’d like to recommend a certain way of doing things none of them are better or worse. It all just depends on what you need. If you have a large number of projects putting the code in the event title is best. If you have fewer projects and need more visual representation - colours are perfect. If you have a small team and need work transparency for your clients then a separate calendar is best. It’s what suits you and your team. Hopefully, this has given you a small insight into how you can use Google Calendar for project management.